Your first video...
Recently I was at a conference and a company decided to make a video to support their point. Awesome! In the world we live in, video is a powerful tool and we have all sorts of great equipment available at the tips of our fingers...
Recently I was at a conference and a company decided to make a video to support their point. Awesome! In the world we live in, video is a powerful tool and we have all sorts of great equipment available at the tips of our fingers. I recently watched a YouTube video where someone was comparing my main DSLR shooter to an iPhone 7 Plus. The crazy part is, the iPhone kept up surprisingly well with the DSLR in the right circumstances!
Maybe your church is exploring video announcements, or you would like to make a recap of your vacation to share with your family, or some other creative idea you have in your head, but don't want to pay hundreds of dollars to see it happen. Here's a few tips for those of you who have no experience making a video, but would like to give it a shot:
1. Story is King
Without a good story line, your video will be hard to watch. Before you get out the camera, sit down and think through exactly where you want to take your audience. Think of it as a roadmap. Where are they now and where do you want them to be? How do we get from point A to point B, and what do you want to show them along the way? Start with the BIG IDEA of the video. What you are trying to say in one phrase. Once you have that phrase at the top of the page, figure out where your audience is, and where you want to take them.
We live in a fast paced world. There's a reason why commercials are very short. We have short attention spans. Try and make your video no longer than 90-120 seconds. If you can't convince me in 120 seconds, you probably won't. Coca-cola does an amazing job telling their story in 90 seconds. Watch their videos and you'll see it's possible. Never make a video longer than 4 minutes. That's way too long.
If you want to use stats in your video, use them to tell the story. Story is much more powerful than stats. I will not remember the statistic you gave me, but I will remember the story of the girl on the street you interview. Steer away from numbers.
2. The 3 main components of video
Once we have the storyline written out, every video has 3 main components: audio, lighting, and a camera to capture the video. Without thinking through any of these components, your video will be terrible.
3. Audio is the most important part of making a video
THE MOST IMPORTANT component of making a video is audio. You can sit through a grainy video on YouTube, you can watch a dark shadow filled video. With terrible audio, your video goes from being decent to unwatchable. This is where you separate the good from the bad videos. Make sure to think through audio above everything else.

Essential Tip: The closer your microphone is to it's subject, the better the sound.
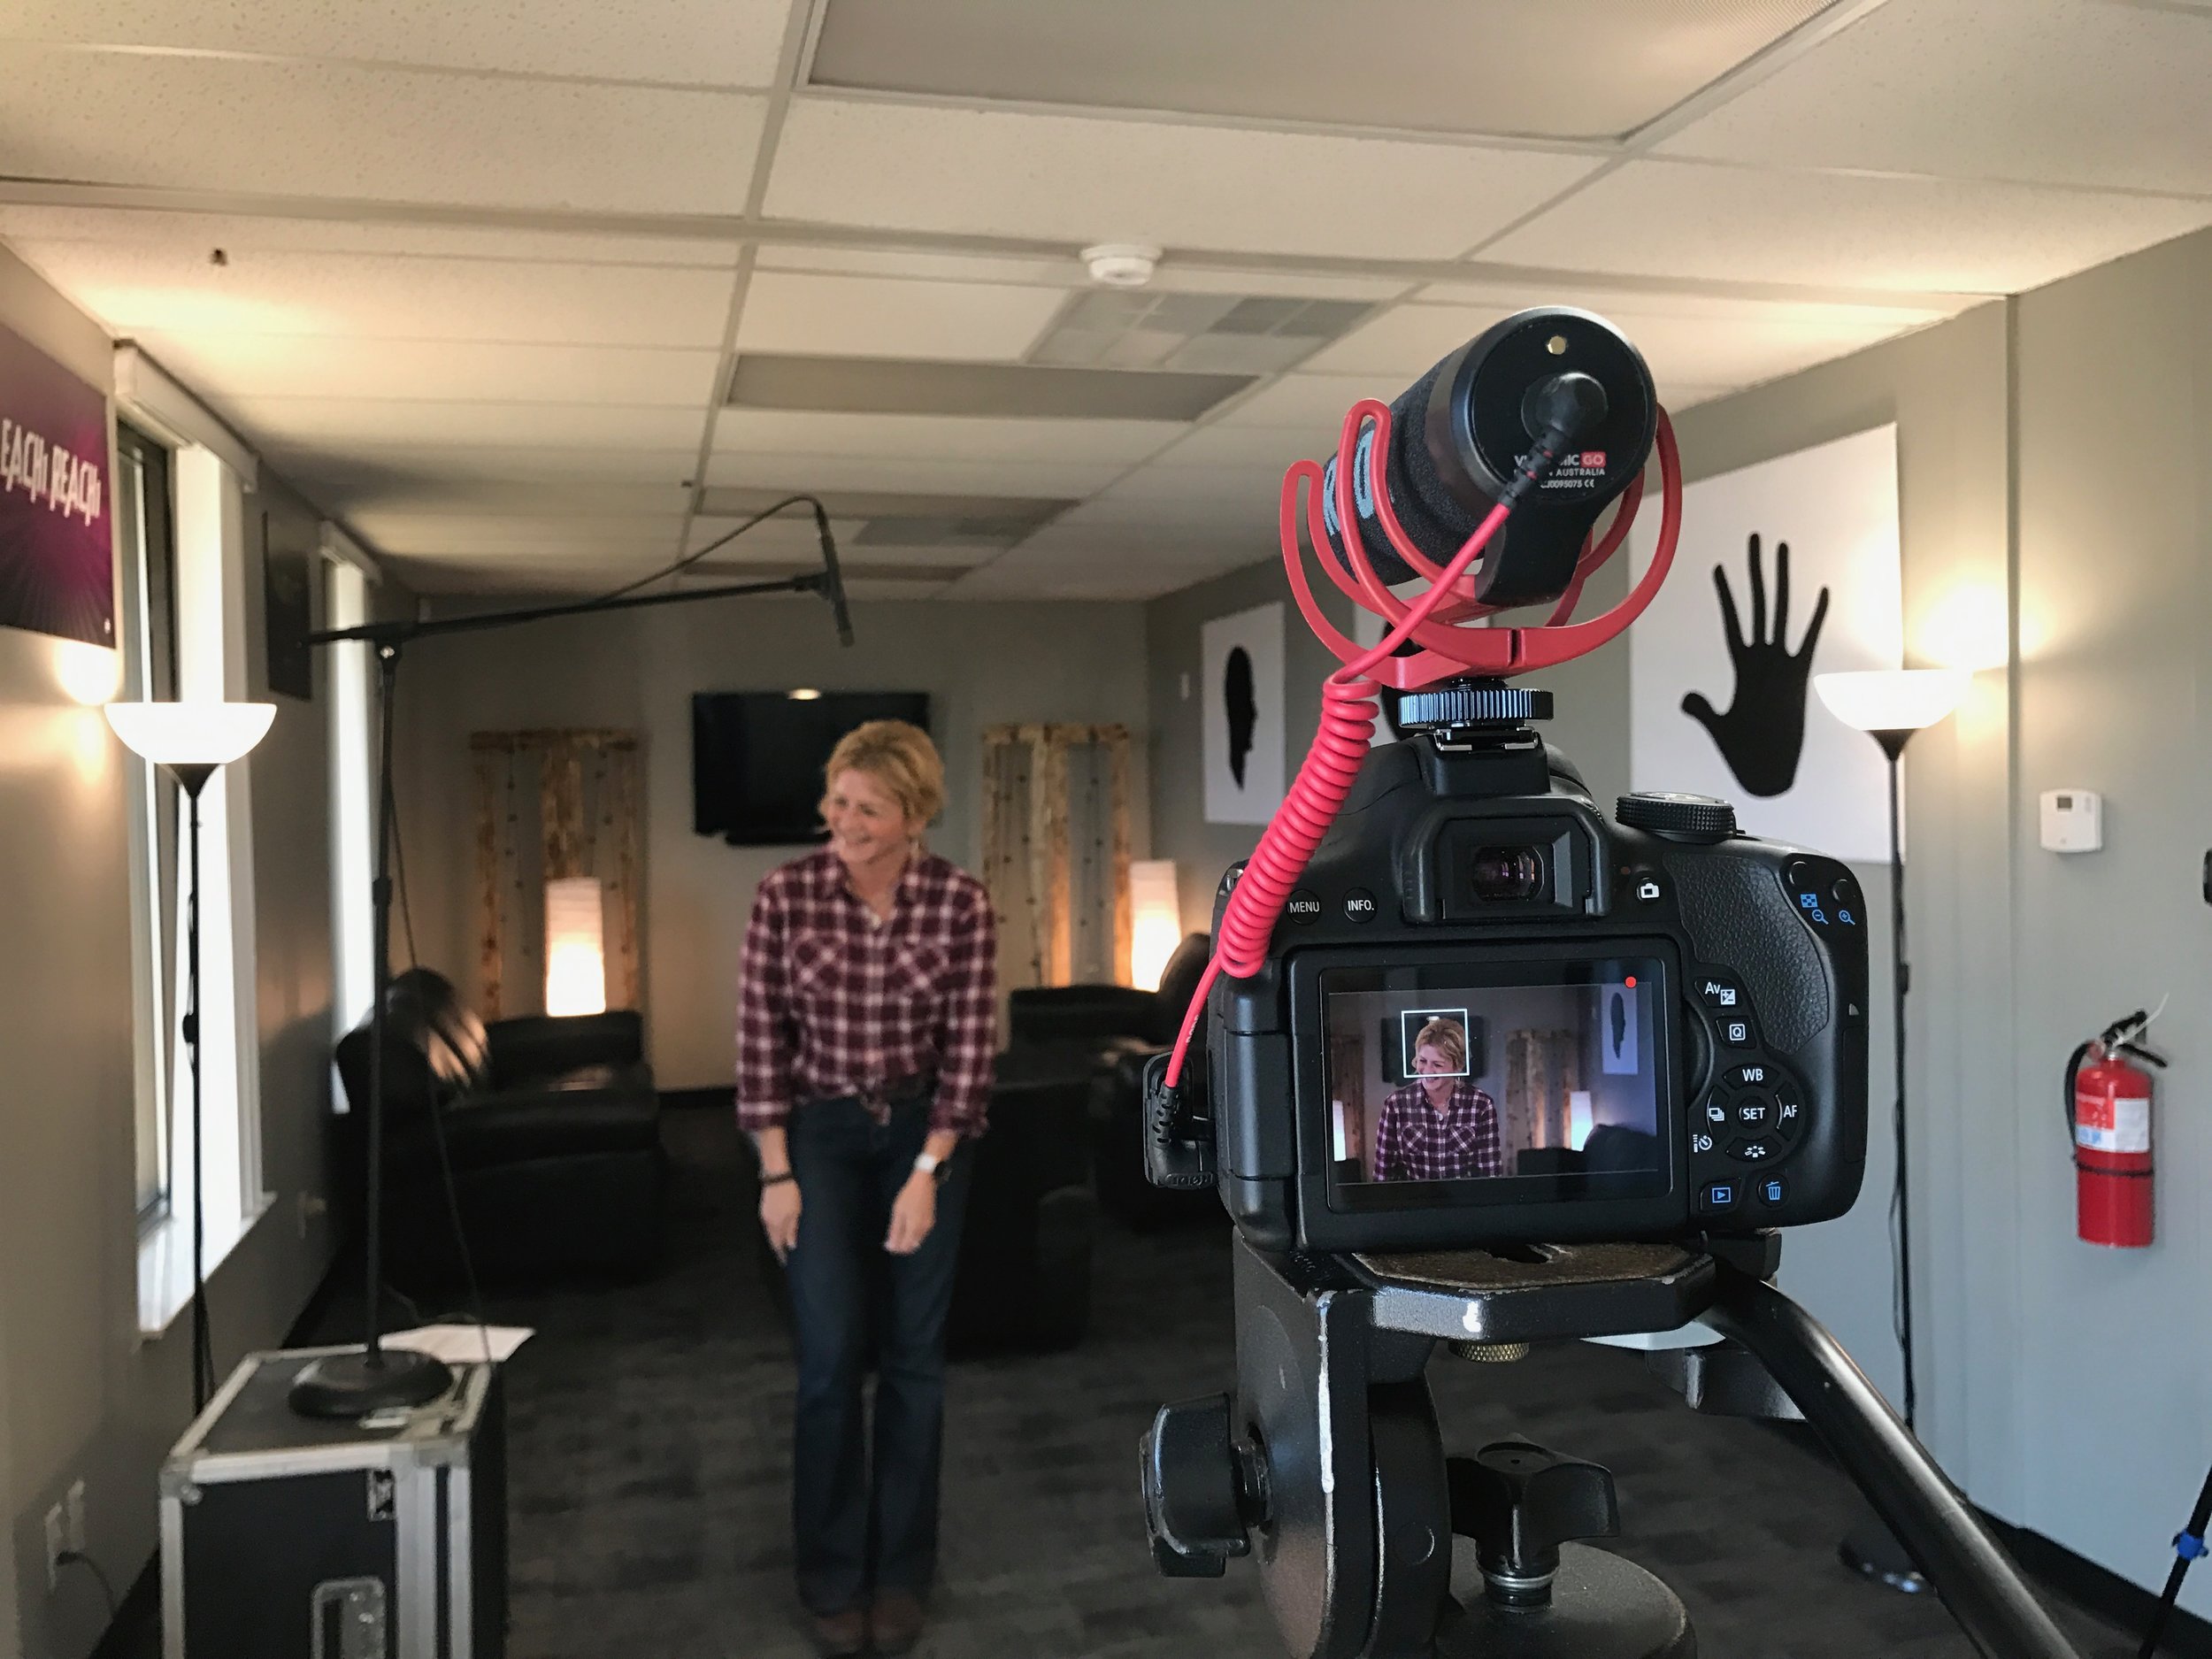
There's several different ways to capture audio, but usually the camera's built in microphone is not one of them. Your camera is placed with your subject in mind, not audio. The farther away you are from the source, the noisier (echoes, hissing, ambient sounds, inaudible words) the shot will be. The best way to capture the audio is to use some sort of additional recording device as close to the source of the sound as possible. You want to position your microphone absolutely as close as possible without being seen in the shot. You can even you an iPhone as a recording device, as long as it's within just a few feet away. I have been using a condenser microphone on a boom stand directly above the subject. With this setup, I can get the microphone inches away from the subjects head without seeing the mic in the frame. It's amazing how close you can get the microphone if you are careful. Also, use your composition (makeup of the frame) to your advantage for audio. If your subject is sitting at a table, use a small plant to block the view of the camera from the recording device or microphone. As long as you cant see the microphone and you can get good sound, it's fair game. Be creative.
You can buy a lapel that plugs directly into a smart phone to get the mic very close. I am not a huge fan of lapels because people typically do not naturally wear a mic strapped to their shirt all the time. It just doesn't look natural to me. If you can find a way to hide it so I don't know it's there, use it!
4. Lighting is more important than the video itself
Similarly to audio, lighting is more important than actually shooting the video. The way all cameras work is through lighting. The brighter the subject, the better the quality. Make sure to take time and think through lighting. A standard studio style of lighting is 3 Point Lighting. When shooting a video indoors, I usually have a main light on the subject, a light cancelling the shadows from the main light, and then some sort of light behind the subject to help create depth and dynamics. You can get creative with your lighting. Use everyday household lights or even a shop light! You'll be surprised of the difference in quality if you think through your lighting.
You do not need to spend TONS of money on lighting. We have used bright shop lights covered with wax paper to make the light softer. I have used the glow from a TV for back lighting. I have used a simple light bulb to help fill in the light. Don't forget, daylight is free. Position your subject near a window and you get lighting for free!
Be creative! This week I was helping someone create a welcome video for their website. We used a pulpit, music stand and shop light to help light up the already lit room. It makes a huge difference!
A few lighting tips: If you are shooting someone with glasses, move the light higher to avoid glare on their glasses. If you add a light behind the subject, but can't see the light directly in the camera frame, you will create a defining glow around your subject. If you are outdoors on a sunny day with strong shadows, stand under a tree in the shadows to shoot your subject, but make sure there are no holes in the shadows for light to shine through on your subject. This is very distracting.
The brighter the shot, the less your camera has to compensate for low lighting, making a better image. Take a few extra moments to think through how to get great lighting. Take a test shot, even with street interviews. Think through a few spots that would be great lighting for the interview before asking your subject to share.
5. Turn the camera horizontal
It amazes me how many videos I see someone shooting vertical. I have never ever seen a vertical tv in someone's home. Remember, if you are shooting a video, turn the camera on it's side and take the shot long ways. No exceptions.
Speaking of the camera, here's a few tips:
- Don't shoot 4K. Even if your camera has it, your computer probably isn't fast enough to edit 4K yet. Mine isn't... and I do this for a living.
- Shoot a few seconds before and a few seconds after. It's better to have a little extra film than not enough.
- Shoot some B roll. Grab some supplemental footage of the area you are recording. Try to shoot some additional footage of the subject at a different angle, possibly grab some of the surrounding environment, maybe even record some close up shots of something to help tell your story. Be creative. You will use this footage later to help enhance your final product. Once again, its always better to have too much footage.
- The rule of thirds. If you are not familiar, divide your camera into 3 sections both vertical and horizontal and stick your subject on one of the points. It will look better. It's always fun to break rules, but... it's a rule for a reason.
- Stabilization is key. Figure out a way to keep your camera from shaking. iPhones have good image stabilization, but it's not perfect. If theres no need to hold the camera, find a way to prop it up. I use a tripod for most of my stabilization. Don't overlook stabilization.
6. Editing/Final touches
If you are considering making your own video, chances are you have some sort of editing software. iMovie, for a beginner, is not too bad. Simply drag your footage and assets (things like logos and motion graphics) into your editor and organize them from the beginning so they are all easy to find.
Line up your recorded audio and recorded video with the sound waves from both files in the editor. Line up the peaks and valleys until it sounds very close, and then mute the bad audio.
Transitions are exactly what you think they are: the transition between two clips. Don't get too crazy. crossfade, straight cut, etc. The longer and more dramatic the transition, typically the cheesier it is. Think fast. Don't have any extra time in your clip or it will feel too long. Remember you only have 90 seconds to work with anyways. To break up long sections of talking, overlay your B roll you shot on site to help keep the attention of your viewer. Use your B roll to help tell your story, not distract from it. Remember timing is everything when it comes to a consistent project.
Words: Sometimes you will want to add words/sentences/titles to your video. Keep it simple. The fewer the better. Make sure to have a large margin around your text and make it easy to read. Never overlap text. It doesn't look good and it's hard to read. It comes across as a mistake, not art.
7. Background Music
Music is a very powerful part of your video. It can change the mood instantly.
Just because you purchased the new album from David Crowder, does not mean you have the right to use it in your video. Legal music for you to use in your video is considered Royalty free music. There's tons of it available for free online, just search for what you want. Another option is to create your own track in something like GarageBand. Find a loop/track that works for you and have fun creating.
Remember music is to support your audio, not compete. If you are struggling to figure out what you should listen to, chances are your background music is too loud.
Video can be intimidating and the best way to improve your video making capabilities is to make more videos. My first videos were "meh" at best. After doing it for a few months, they were dramatically better. Have fun, remember this is a creative process. Don't feel like you have to do it alone. The more people involved, the more ideas you will have to work with. Ask for help.
If you have any questions to get started in your video making, I would love to help you! Feel free to ask.

Apps for Worship
This week I went to the Apple Store and bought a gigantic 12.9" iPad for Evident Church. I may have a problem. When I walk in the Apple Store, the employees recognize me! Needless to say, I am a huge fan of using technology to its fullest...
This week I went to the Apple Store and bought a gigantic 12.9" iPad for Evident Church. I may have a problem. When I walk in the Apple Store, the employees recognize me! Needless to say, I am a huge fan of using technology to its fullest when it comes to leading worship. When the iPad was first released, I was skeptical. I didn't see why I would need one if I had a computer and an iPhone. The advantage of having a tablet has been a game changer for me. The reason: developers have created apps for specific purposes of my life. Because of my iPad, I no longer have to carry additional books or chord charts along... and I have every single one with me!
Here's a few of the apps I use specifically for leading worship. Without these apps, life would be much more difficult!
OnSong - Chord Chart Management App

When I purchased this app several years ago it was only a few bucks. Now, it's closer to $20. Although it comes with a pretty hefty price tag, for me it's totally worth it. This app is essentially my chart book. It's able to handle chord pro style, or you can download pdfs right into it. I store all of my music charts and I'm able to create set lists each week. I play through the first song and swipe to the right and the next song is in order for me. If we need to change a key or add a capo, it's just a click away. No need to ever print out music again! I use a looptimus foot pedal connected with a USB cable to control my iPad through midi signals. This let's me control the iPad hands free. I can add sticky notes, rearrange charts and even sync the iPad with others on the stage. This app continues to improve and become more stable. I can't imagine trying to go back to sheet music.
Planning Center - Church Management Software

If you are living under a rock, planning center is a mega organization these days. More than just an app, this service allows you to schedule musicians and set lists, store content, check in your kids, send emails and much more. This app easily allows me to communicate with my team leaving notes for the service order and pretty much anything else I can think of. Most churches I work with these days use planning center. There is a subscription fee for the service but this app is free. This is the industry standard when it comes to church service organization.
YouVersion Bible App

You can't list apps to lead worship without mentioning a bible app. The YouVersion Bible app is a great tool with pretty much any version you like. You can take notes, highlight, find reading plans and more. Our church actually has a YouVersion event you can even follow along with the sermon notes. I love always having the Bible with me, no matter where I am. The best part, it's free! Everyone should have this app on their phone. Everyone.
Loop Community Prime MultiTracks App

For the past several years we have been using loops/tracks in worship with a click track (metronome). We've tried many different apps to run our loops and tracks, and have recently landed on using Loop Community's Prime App. The beauty of this app is the simplicity. We can store all of our loops in the app and when there's no loop, we can load just a click track. Ableton Live is our preference, but when it comes to simplicity, this app is hard to beat to run our loops. You can upload your own loops, or purchase loops from a community base online at loopcommunity.com. They usually have a free app of the month, so make sure to check that out!
GarageBand Music Creation app

Don't write this one off because it's a free app from Apple. This app is very powerful. Loaded with great sounds and loops, we've used this app live and for recording parts we need to add to our sound. We've even plugged the iPad into a midi controller and used this to run keyboard synths and pads. I've used this app with my looptimus pedal as well. This one is free, download it, play around and have fun with it. If you are going to use your app for live performance I suggest you get an interface that works with iOS devices and a USB cable adaptor. Someday I will discuss this in detail.
Novation LaunchPad Music Creation App
I use this one for a few things. This is an EDM style music creation app. There's a grid of squares and each grid is a different sample. you can play one square in each column making an unlimited amount of different sounds. I use this app to create backing tracks, music for worship videos, or just to hype up the atmosphere in the room. You can buy different packs and they have a few different ones. You can make your own pack by uploading new samples or combining samples from different packs. You can even play along with these samples if you can find some that aren't so hardcore. This is a fun app with lots of possibilities for music creation. You can also use this app to fire off loops you've created as well. They've had some great updates over the years making this a powerful app.
Polytune Guitar Tuner App

In a pinch, this app has saved me. I have a polytune tuner on my electric guitar pedal board and a Polytune clip in my acoustic case. As far as tuners, they don't get much better. On occasion, like in Guitar Center, and I am fighting a stubborn guitar, or just need to get the root E tuned in cause it's so messed up from some 12 year old playing it, I always have a guitar tuner with me. This is basically all this app does, but it does it well.
ProRemote ProPresenter Controller

If you use ProPresenter, you can leave your computer plugged in near the projector in a portable situation and control your presentation software from an app. I was leading worship up in Northern Michigan and this was the exact situation. The computer and projector were in the middle of the room and it was very annoying to have to wire the laptop across the room so we set the laptop on the projector crate and used this app to control the lyrics and fire off slides. Very useful. I would highly recommend this to anyone using ProPresenter in a portable situation.
Dropbox, & iBooks, Notes, Reminders Apple Apps

The beauty of an iPad is you always have your work and thoughts with you. Productivity apps are great tools to help you stay organized and keep you on track with what needs to get done. I use a mixture of Apple Notes, Reminders and email to stay on top of what needs to get done. Having a dropbox account lets me share and sync documents with others. All of my books are now digital, always with me. I lose the smell of the freshly printed pages, but having every book I read with me at all times, being able to search words or phrases in every book all at once, taking notes within the books... and then being able to search the notes, it amazes me enough to get over having to lug around a stack of books I need to read. Find a system that works for you an pump out work on your iPad. I have a mac and an iPhone and all of of devices are completely synced. It's a beautiful thing.
At the end of the day, are any of these apps necessary to live? Nope, but they make life easier for me, especially in worship. After using an iPad and these apps for years now, it would be hard to imagine doing ministry without them. It's not impossible, but I am blessed with the right tools to equip me to do my job the best I can.
What apps do you love??

Care: Acoustic Guitar
It seems a bunch of my friends currently are in the market for a new acoustic guitar. If you have spent any time at all with me, you know my love for Taylor Guitars. I know they are not for everyone, but...
It seems a bunch of my friends currently are in the market for a new acoustic guitar. If you have spent any time at all with me, you know my love for Taylor Guitars. I know they are not for everyone, but I personally feel Taylor puts money where they need to and although they are pretty expensive, it is a tool that will last you decades. Here's a few tips on how to get the best sound from your guitar and care for your acoustic, whether or not it's a beloved Taylor.
Tip #1 - Play your acoustic!
You may have noticed your guitar can sound different at times. Sometimes when you play it, you are amazed! Other times, the same guitar leaves you wishing for more. It's not your ears playing tricks on you, it's true, the guitar sounds different! One of the best things you can do for your acoustic guitar is play it! Wood is actually very responsive. When you don't play your guitar, it closes up and tightens. When you play it frequently, the sounds resonate and open up the wood, making the guitar sound brighter, deeper, and more full. I try and play my acoustic at LEAST 3 times per week. Lately, I've been making it a goal to play it every other day to keep it open. If it sits in it's case for a few months, it isn't ruined, but it will take awhile to open back up. Do your best to show some love to your acoustic.
Tip #2 - change your strings, when they need it
Strings can make or break the sound of your guitar. Whenever I feel like my guitar is sounding dull, or unresponsive, even though I have regularly been playing it, it usually is time for new strings. There isn't a certain time frame strings last. I've had some strings last over 6 months, even though I was putting in 40-50 hours/week on them. Other times, they don't last 2 weeks. You need to be the judge of when you need to change your strings. Usually if I break a string (unless it's the next gig after I change them), I will go ahead and swap the whole set out instead of just the one that broke.
Most manufactures will indicate on their website what the original strings were installed on your guitar. Most of the time, those are going to be the best strings for your guitar. They spend a lot of time and money finding what strings sound best so make sure to take their advice. BUT, changing the strings on the guitar will help you shape the sound of your guitar, making it your own. If you would like more bass, try a thicker gauge string. If you want it to sound brighter, maybe switch from a bronze to 80/20 mix. I am a big fan of Elixir strings, which fortunately is what my guitar originally came with. For me, the coated strings last longer, sound better, and feel better. Here's a video on the best way to change your strings.
Tip #3 - use a humidifier
I haven't always used a humidifier in my acoustic guitars. When I got my first acoustic, I didn't... and it has lots of cracks. It looks really cool, but I wouldn't wish a giant crack down the top of a guitar on anyone. A humidifier will help keep your guitar from cracking, but will also help your guitar sound better. When it has the proper moisture it is able to breathe the way it needs to. I use the Oasis Guitar Humidifier. $20 on amazon and I fill it with water when it shrinks. The best part of this humidifier is it will humidify the guitar even if it isn't stored in it's case. In my office, my guitar is hanging on the wall. It's still working even though it's out of the case. Also, it will never touch the wood. Some humidifiers have bags in which you put crystals. The bags end up leaning on the wood, which can cause rubbing, or uneven humidity. Just buy the Oasis once a year and be done with it.
Also, make sure to have a way to read your humidity in your case! I recently purchased the TaylorSense monitor which updates on my iPhone. Yep, there's an app for that...
Tip #4 - Plug it in
So you just got your new guitar and you want to test out it's electronics! Good! First of all, always keep a few extra batteries on hand. I've found duracell batteries work the best with my guitar. Don't assume every 9V battery will work... I tried to use a cheap one and it didn't fit!
Also, spend money on a decent direct box. A direct box converts the signal from unbalanced to balanced. You need one. Don't just get a cable that goes from 1/4" to XLR and plug into a mic line. You just spend $2000 on a legit guitar, don't skimp and bottleneck your beautiful guitar's sound with a cheap direct box or cable. I highly recommend the Radial Stage Bug SB-2. There is a difference between direct boxes. Some cause noise, or weird phasing issues. I've never had trouble with the stage bugs. This one in particular is labeled for bass & keyboards, but I prefer it over the stage bug labels for acoustics. If you want to spend even more money, you can upgrade to the industry leading Radial JDI.
If you want to get creative, you can use some guitar pedals to color your sound. I've used preamps, reverbs, compressors, and delays on my acoustics. Right now, I am currently running straight into the board. You can get as creative as you want with your sound. (Pro Tip: Chorus pedals on acoustic guitars were a hit in the 90s & early 2000's. Today, reverb is the iconic sound. Stay away from chorus on your acoustic unless you are going for a retro sound.)
Tip #5 - Find some friends
One of the best things you can do to improve the sound of your guitar is find people you can spend time with and learn from. You can practice by yourself all day long, but when you spend time with others, you become a better musician. If you don't have a network of musicians, you can't expect to grow. I've been on staff at Evident Church for the past 5 years and I view these people as my family. When I am making music with a group of people, there's a special connection, unexplainable. These people help me grow as a musician, a Christian and as a human. They will always have a special place in my heart.
Your music you create is more than just for you. Share it with the world! Music is powerful.
“Where words fail, music speaks.
- Hans Christian Andersen”
What are some ways you have found help take care of your acoustic? Feel free to comment below!

Gear: Photography
I love GEAR! Gear doesn't make you great, but having the right tools makes getting the right shot much easier. For YEARS I've used my iPhone or point-and-shoot Canons on auto mode. It wasn't until the past few years...
#TEAMCANON
I love GEAR! Gear doesn't make you great, but having the right tools makes getting the right shot much easier. For YEARS I've used my iPhone or point-and-shoot Canons on auto mode. It wasn't until the past few years I've invested time and money in learning how to manually shoot with a DSLR and I'm in love. Once you understand how to manually control your camera, you can get some great shots with relatively inexpensive gear! Here's a list of the major components of my camera setup currently.
camera body: CANon Eos 80D
There's a lot of debate right now in the camera world between DSLRs and Mirrorless. It seems as though many DSLR Canon shooters are switching to the Sony lineup, and honestly they are decent cameras loaded with capability. I recently just purchased my first personal DSLR and I took some time working through exactly what I wanted. For me, flexibility was more important than anything. I am both a photographer and videographer. In all honesty, the Sony A series cameras have more features for video (120fps, 4k, etc…) but the DSLR ecosystem Canon has created is unbeatable. I decided the Canon DSLRs still produce great video quality AND I can use the same camera for amazing photography.
Once I decided I wanted to stay with Canon's DSLR lineup, I had to work through if I wanted a full frame or a crop sensor camera. The major advantage with the full frame is low light capability. Bigger sensor equals better low light imaging. The major advantage with the crop sensor is price (which is a big deal for me) and size (which is not really a big deal for me). I ended up buying a crop sensor for the fact I would rather invest in better lenses and eventually upgrade to a full frame camera.
I ended up buying a Canon EOS 80D. This is one of the the top of the line crop sensors from Canon and one of the best DSLRs for video in my opinion. I can wait on 4K. My computer can't handle the editing anyways yet.
RUNNER UP: I was strongly debating between the crop sensor 80D and the full frame 6D. If I was upgrading just for photography, I would have bought the 6D, which is about the same price. The 80D has some really good features for video though, enough to make me choose a crop sensor.
The Canon EOS 80D is known for it's amazing dual-pixel auto-focus, which makes this camera stand out. This high-end auto-focus paired with the articulating touch screen sold me on this camera. I am able to make videos along with having a very impressive photography camera. After having this unit for awhile, I have no regrets on my decision. QUICK TIP: I purchased this camera on Canon's Refurbished website. If you watch for the right deal you can save hundreds! I have also purchased several lenses from their refurbished site and never had a problem.
Favorite Lens: Canon EF 50mm f1.8 STM lens
This is by far my favorite lens. It's great for video, it's great for portraits, is great for bokeh, and it's dirt cheap! I bought this lens for less than $100 on Canon's refurbished website. You can't go wrong with it.
I purchased the STM lens because I use it for both photography and video. There's other versions of the same lens, but from what I hear, STM is great for video and I've never had a problem with my STM lenses.
Canon 80D - ISO 800, 50mm, f1.8, 1/80
As much as I want to use other lenses, I seem to always come back to this one because of it's beautiful images and ease of use.
One of the best features of this lens is it has the same "look" as our eyes. Some lenses make things look farther away, or closer up (We'll talk about lens compression later). The 50mm has a similar look to what we see.
Regarding Prime Lenses: There's a lot of debate about prime lenses (fixed lenses you can't zoom). For me, most of the time, the best route is to buy zoom lenses. Prime lenses are typically more expensive for only being able to cover one focal length. The 50mm, aka as the nifty fifty, is a dirt cheap, QUALITY lens. Although it isn't a zoom, this lens is almost always on my camera. For the most part, the best use of your dollar is a zoom lens, but this one wins the "favorite lens" award from me.
Ultra wide angle lens: CANON EF-S 10-18mm STM
When it comes to ultra wide angles in the Canon universe, there's two EF-S lenses: the 10-18mm and the 10-22mm. After researching for weeks, I had the impression the 10-22mm wasn't worth the extra money. I am very happy with my ultra wide lens I chose. Although this is a very particular lens with a particular purpose, It usually ends up staying in my bag.
Ultra wide lenses expand the focal range of the picture along with capturing a very wide angle. With this lens, it's best use is in wide open spaces, such as a lake or cityscape. Getting too close to faces or objects can create a very distorted image.
Canon EOS Rebel T6i - ISO 100, 10mm, f4.5, 1/3200
Along with being able to capture a very wide angle, it essentially stretches the image out. Something 20 feet away looks like 100. This works well on certain things, but not on others. With the right angle, I can make a 25 foot dock look like it goes on forever, but, recently visiting Belle Isle in Detroit, trying to shoot the skyline looked a million miles away. Depending on the look you want, you can create a very unique shot. I've found the best use for ultra wide angle lenses are in Nature, or trying to capture a whole room. At 10mm, you will see distortion in the room. Although this is a fairly slow lens (f4.5-5.6), I find most of the time I use this lens in the daylight with decent light so the aperture still works. Typically you want big landscape images all in sharp focus so depth of field is not an issue either.
Telephoto Lens: Canon EF-s 55-250mm stm
I am always trying to find the balance of having great gear and spending money wisely. If I had the money, I would run out and buy a 70-200L, but that's a $2000 lens. The 55-250mm is surprising good for the price. It's a step up from the 75-300mm lens and you can pick one up for a relatively small amount of cash.
Although this is an inexpensive lens, I am still able to get really nice telephoto shots. The opposite of of a wide angle, a telephoto lens compresses images along with being able to shoot very far away.
Canon EOS 80D - ISO 400, 186mm, f5.6, 1/250
One of my favorite features of a telephoto lens is being able to get a nice depth of field in my images. Even though the aperture is pretty high on this lens (f4.5-5.6), because of the far focal length, I am still able to take clear shots from far away with a nice blurry background because of the distance between the subject and the background. I would suggest any telephoto lens you have NEEDS to have Image Stabilization. The farther away you are, the more magnified your tiny shakes and movements are. Although a smaller f stop would be nice, this lens is a great compromise for the famous L white lens. It's very compact, light, and inexpensive, all things I want in a lens. In the future, I will probably upgrade, but for now I will craft my skill with this telephoto and when I upgrade my gear, I will already have the ability to shoot great shots.
A few Extras
Besides my 3 main lenses (10-18mm, 50mm, 55-250mm) there's a few extra components I use almost every time I go out to shoot.
Manfrotto BeFree Travel Tripod
Manfrotto BeFree Travel Tripod - There's few things I really like about this tripod. This is a very light tripod with a small footprint when it's folded up. In the wind, it's so light, it actually can move so Manfrotto added a hook on the base to hang a backpack to help! This tripod has a built in quick-disconnect base. Another huge plus for me. This tripod is great for photography, but not so much for video. There is a version with a fluid video head you can buy.
Peak Design Clutch
Peak Design Clutch - This is a simple but very effective extra. All this strap does is hold the camera on my hand. I've tried straps that go around my neck, but for me, I love the extra support I feel on the back of my hand with this clutch. It never leaves my camera. If you haven't already, check out Peak Design. This is a solid company with great products. I also use the Capture Pro and Pro Pad for long shoots.
Canon EF-S 24mm f2.8 STM
Canon EF-S 24mm f2.8 STM - This is a 4th lens I occasionally use. It's really useful because of it's small size. With a crop sensor camera, it's about a 38mm so it's technically a wide angle lens. This is a perfect lens for selfies, keeping the camera small or chasing around a 2 year old. I am able to quickly get the close up shot. For around $150 new, you can find a deal on a refurb or used for around $100. It's worth to have on hand for certain occasions.
These are basically the main tools I use every time I go out for a shoot. In all honesty, you can have a great setup for relatively cheap and still get some amazing photos. Gear is important, but you always need to know the equipment you have and use it to it's fullest. Someday I will probably upgrade to a full frame camera and all new L series lenses, but for now, I am able to capture great photography and video. I am very pleased with my setup and proud of the art I am able to accomplish.
What's your favorite piece of gear you have? Do you have any experience with the gear I have?

5 BOOKS FOR CREATIVES
Reading is a HUGE must for the creative. Here's 5 books you should be reading to help your creativity...
READING
Reading is a HUGE must for the creative. Here's 5 books you should be reading to help your creativity:
1. BIBLE
DUH! We should all be reading the Bible, Right?! As much as that's true, it doesn't always happen. As creative artists, we must make reading our Bible a daily priority. here's a few reasons why:
- Input/output - What we input is what we will output. If we want to produce healthy output, what better input can we take in than the Bible?! Just remember:
What you say flows from what is in your heart. (Luke 6:45nlt)
- Examples of excellent creativity - There's so much creative content stuffed in the Bible. The whole book of Psalms is just a bunch of poems, that have lasted for thousands of years! When I feel stuck, a great place for me to look for solid content to help my creativity flow is the Bible!
- It's always with me - If you haven't already, download the YouVersion Bible App. What an amazing tool! You can highlight, share, save, make images, there's even an iMessage app. This is a huge tool for me I use throughout my day.

2. Pursuing Christ. Creating Art.
Besides the Bible, this has been the book that has the greatest impact on my life and creativity in the past several years! If you haven't already, I highly recommend it! No, it will not give you tips on how to create more or better, it will help you understand how your creativity works and the purpose of it.

3. The purpose of man
Understanding our purpose will help us in our creativity. Tozer does a great job helping us understand the purpose of why we are here and what we should do about it!

4. Make your idea matter
Story is king. This isn't a fad. Story is king. If you want people to remember your idea, you have to give them a reason to remember. Read this book. Especially if you have your own business.

5. Creativitiy inc.
Speaking of story, this entire book is on the story of Pixar. Just to warn you, this is a book you will have trouble putting down until it's finished! The stores will keep you captivated all the way through with little nuggets of truth to apply to your life. Get it! It's worth it.

Bonus How to be creative: 5 steps to boost your creativity
This is a simple, fast read. Lots of great reminders sprinkled in this little book. These 5 Steps, although simple, are powerful. Check it out. Currently the digital version is free on Amazon!

If you want to be creative, you have got to investing in yourself and your mind. I found myself constantly pouring out and never having any input and I had nothing left.
What books have you read to help fuel your creativity?